Version: Search Guard 5 / This is an older version of Search Guard. Switch to Latest version
Kibana authentication
How it works
The Search Guard Kibana plugin adds two ways of authenticating with Kibana against a Search Guard secured cluster:
HTTP Basic authentication
This is the default. If not already authenticated, the user is redirected to a login page. The credentials the user enters on this page are validated against Search Guard by adding them as HTTP Basic Authentication headers. Once authenticated the credentials are stored in an encrypted cookie on the user’s browser.
Make sure you use TLS on the REST layer of Elasticsearch so the transmitted credentials cannot be sniffed.
SSO authentication
In this mode, the Search Guard plugin will forward any white-listed HTTP headers, such as JWT or proxy headers, to Search Guard. In order to use SSO, make sure to:
- Disable the HTTP Basic authentication of the plugin. You cannot use SSO and HTTP Basic authentication together.
- Whitelist any additional SSO HTTP header in
kibana.yml, and make sure to also add the defaultAuthorizationheader. Headers that are not whitelisted are silently discarded by Kibana, includingAuthorization.
Basic authentication configuration
Use the following settings in kibana.yml to configure the authentication:
| Name | Description |
|---|---|
| searchguard.basicauth.enabled | boolean, enable or disable the login dialogue management. Defaut: true |
| searchguard.cookie.secure | boolean, if set to true cookies are only stored when using HTTPS. Default: false. |
| searchguard.cookie.name | String, name of the cookie. Default: ‘searchguard_authentication’ |
| searchguard.cookie.password | String, key used to encrypt the cookie. Must be at least 32 characters long. Default: ‘searchguard_cookie_default_password’ |
| searchguard.cookie.ttl | Integer, lifetime of the cookie in milliseconds. Can be set to 0 for session cookie. Default: 1 hour |
| searchguard.session.ttl | Integer, lifetime of the session in milliseconds. If set, the user is prompted to log in again after the configured time, regardless of the cookie. Default: 1 hour |
| searchguard.session.keepalive | boolean, if set to true the session lifetime is extended by searchguard.session.ttl upon each request. Default: true |
Customising the login page
You can fully customize the login page to adapt it to your needs. Per default, the login page shows the following elements:
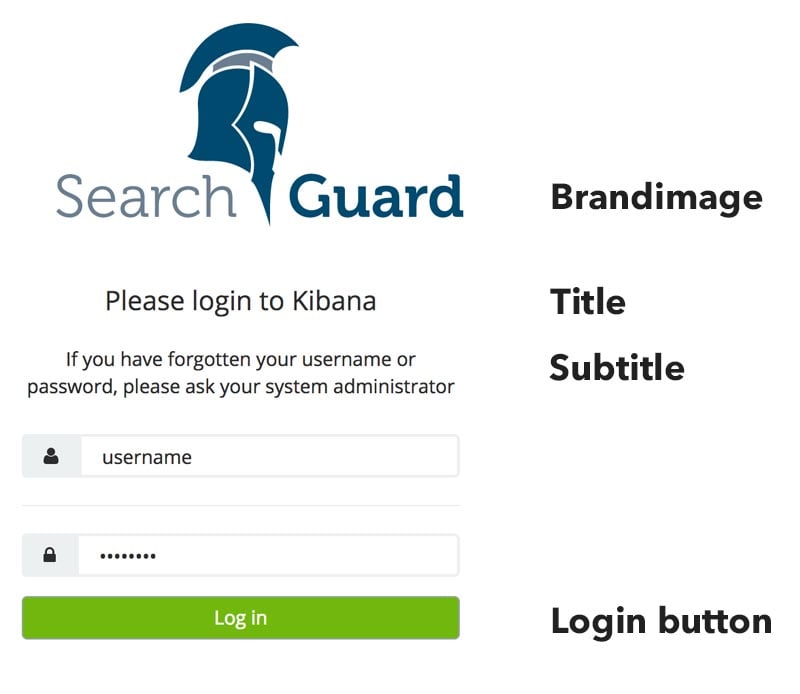
Use the following setting in kibana.yml to customize one or more elements:
| Name | Description |
|---|---|
| searchguard.basicauth.login.showbrandimage | boolean, show or hide the brand image, Default: true |
| searchguard.basicauth.login.brandimage | String, src of the brand image. Should be an absolute URL to your brand image, e.g. http://mycompany.com/mylogo.jpg. |
| searchguard.cookie.name | String, name of the cookie. Default: ‘searchguard_authentication’ |
| searchguard.basicauth.login.title | String, title of the login page. |
| searchguard.basicauth.login.subtitle | String, subtitle of the login page. |
| searchguard.basicauth.login.buttonstyle | String, style attribute of the login button. |
SSO configuration: Whitelisting HTTP headers
In order for Kibana to pass HTTP headers to Elasticsearch/Search Guard, they need to be whitelisted in kibana.yml.
If you only use HTTP Basic Authentication, then no action is required, since the Authorization header is set by default.
If you use any authentication method that relies on HTTP header fields other than Authorization (for example, proxy based authentication), you need to explicitely add them, for example:
elasticsearch.requestHeadersWhitelist: [ "Authorization", "x-forwarded-for", "x-forwarded-by", "x-proxy-user", "x-proxy-roles" ]
If you use HTTP Basic Authentication for the Kibana server user, make sure to add the Authorization as well.
Using Kibana with JWT
If you’re using JWT, first disable the login form by setting:
searchguard.basicauth.enabled: false
If you’re using the default Authorization HTTP header field for your token, you don’t need to do anything else in Kibana. If you’re using a different HTTP header field, make sure to add it the header whitelist in kibana.yml:
elasticsearch.requestHeadersWhitelist: [ "Authorization", "myjwtheader"]
Finally, if you’re using HTTP Basic Authentication and the internal user database for the Kibana server user, make sure that the JWT authenticator is first in your authenticator list in sg_config.yml:
jwt_auth_domain:
  enabled: true
  order: 0
  http_authenticator:
    type: jwt
    ...
basic_internal_auth_domain:
  enabled: true
  order: 1
  http_authenticator:
    type: basic
    challenge: false
    ...
Using Kibana with Proxy authentication
If you’re using proxy authentication, first disable the login form by setting:
searchguard.basicauth.enabled: false
Make sure to whitelist all HTTP headers set by your proxy in the header whitelist in kibana.yml:
elasticsearch.requestHeadersWhitelist: [ "authorization", "x-forwarded-for", "x-forwarded-by", "x-proxy-user", "x-proxy-roles" ]
Finally, if you’re using HTTP Basic Authentication and the internal user database for the Kibana server user, make sure that the Proxy authenticator is first in your authenticator list in sg_config.yml:
proxy_auth_domain:
  enabled: true
  order: 0
  http_authenticator:
    type: proxy
    challenge: false
    config:
      user_header: "x-proxy-user"
      roles_header: "x-proxy-roles"
  authentication_backend:
    type: noop
basic_internal_auth_domain:
  enabled: true
  order: 1
  http_authenticator:
    type: basic
    challenge: false
    ...
Using Kibana with Kerberos
If you’re using Kerberos, first disable the login form by setting:
searchguard.basicauth.enabled: false
If you’re using HTTP Basic Authentication and the internal user database for the Kibana server user, make sure that only the Kerberos authenticator has set challenge to true:
basic_internal_auth_domain:
  enabled: true
  order: 0
  http_authenticator:
    type: basic
    challenge: false
  authentication_backend:
    type: intern
kerberos_auth_domain:
  enabled: true
  order: 1
  http_authenticator:
    type: kerberos
    challenge: true
    config:
    ...
Disabling the replay cache
Kerberos/SPNEGO has a security mechanism called “Replay Cache”. The replay cache makes sure that an Kerberos/SPENGO token can be used only once in a certain timeframe.
If a request to Kibana results in multiple subrequests to Elasticsearch under the hood, Kibana will reuse the initial Kerberos/SPNEGO token for all of these subrequests. Depending on your Kerberos setup, this can be interpreted as a replay attack. You will see error messages like:
[com.floragunn.dlic.auth.http.kerberos.HTTPSpnegoAuthenticator] Service login not successful due to java.security.PrivilegedActionException: GSSException: Failure unspecified at GSS-API level (Mechanism level: Request is a replay (34))
At the moment, the only way to make Kerberos work with Kibana is to disable the replay cache. This is of course not optimal, but so far the only known way.
With Oracle JDK, you can set
-Dsun.security.krb5.rcache=none
in jvm.options of Elasticsearch. With this setting, Kerberos works fine out of the box now, however, the security level is lowered a bit of course.